Desktop widget toolbox
Author: b | 2025-04-24
widget toolbox, widget toolbox matlab, widget toolbox in android, desktop widget toolbox, toolbox widget amazon, toolbox widget socket, toolbox widget canada, toolbox widget for sale, toolbox
Desktop Widget Toolbox For Windows
Doubletap to turn screen off / lock! Enable Always on Display on notifications! Unlock the full potential of your phone with this exclusive app!Pixel ToolBox app introduces features like double tap / doubletap to turn the screen off / lock screen without a screen off widget, enable the always on display on new notifications, adds a close / clear all apps button directly to front of recent apps panel, fingerprint unlocking when the screen is off, a customizable ringer mode tile, and an innovative camera launcher system—optimized exclusively for your device! Key Features of Pixel ToolBox:• Double Tap to Turn Screen Off: Forget the power button and instantly turn your screen off / lock screen with a simple double tap / doubletap, whether you're on the home screen or even on lock screen. ToolBox adds a double tap detection to your homescreen or lockscreen. With a screen off widget you have to tap on the widget, with ToolBox you can just tap anywhere on homescreen to turn screen off / lock screen. No need to press the power button when you device lays flat on a table. Just tap the phone to wake the screen and double tap / doubletap to put the device to sleep and turn screen off. Forget screen off widget's and try Pixel ToolBox!• Enable Always On Display / AOD Pixel ToolBox now allows you to enable the Always On Display / AOD automatically for new notifications or enable the AOD when your device is charging with it's build in Always On Display / AOD. Stay updated with essential notifications at a glance, with the convenience of Always On Display / AOD.• Close / Clear All Apps Button You can now close / clear all apps directly from the front of the recent apps panel. ToolBox tuner adds a "Close All Apps" or "Clear All Apps" button directly to the front of the recent apps panel on the system ui!• Unlock with Fingerprint When Screen is Off: No need to wake your screen first. Effortlessly unlock your device using the fingerprint sensor, even when the screen
Desktop Widget Toolbox 2.20 - Downloa
Why can't I install Desktop Weather Clock Widget?The installation of Desktop Weather Clock Widget may fail because of the lack of device storage, poor network connection, or the compatibility of your Android device. Therefore, please check the minimum requirements first to make sure Desktop Weather Clock Widget is compatible with your phone.How to download Desktop Weather Clock Widget old versions?APKPure provides the latest version and all the older versions of Desktop Weather Clock Widget. You can download any version you want from here: All Versions of Desktop Weather Clock WidgetWhat's the file size of Desktop Weather Clock Widget?Desktop Weather Clock Widget takes up around 35.9 MB of storage. It's recommended to download APKPure App to install Desktop Weather Clock Widget successfully on your mobile device with faster speed.What language does Desktop Weather Clock Widget support?Desktop Weather Clock Widget supports isiZulu,中文,ייִדיש, and more languages. Go to More Info to know all the languages Desktop Weather Clock Widget supports.Free Desktop Widget Toolbox - AlternativeTo
Versions.Log in to your JetBrains Account from the Toolbox App, and it will automatically activate the available licenses for any IDE that you install.Install the Toolbox AppDownload the tarball .tar.gz from the Toolbox App web page.Extract the tarball and launch the executable: tar -xzf jetbrains-toolbox-.tar.gz && cd jetbrains-toolbox- && ./jetbrains-toolbox The Toolbox App will install itself into $HOME/.local/share/JetBrains/Toolbox/bin and run from there.After you run the Toolbox App for the first time, it will automatically add the Toolbox App icon to the main menu.Select the product that you want to install.To install a specific version, click and select Available versions.Log in to your JetBrains Account from the Toolbox App, and it will automatically activate the available licenses for any IDE that you install.Standalone installationInstall WebStorm manually to manage the location of every instance and all the configuration files. For example, if you have a policy that requires specific install locations. Download the installer .exe.Run the installer and follow the wizard steps.On the Installation Options step, you can configure the following:Create a desktop shortcut for launching WebStorm.Add the directory with WebStorm command-line launchers to the PATH environment variable to be able to run them from any working directory in the Command Prompt.Add the Open Folder as Project action to the system context menu (when you right-click a folder).Associate specific file extensions with WebStorm to open them with a double click. To run WebStorm, find it in the Windows Start menu or use the desktop shortcut. You can also run the launcher batch script or executable in the installation directory under bin. Download the disk image.Mount the image and drag the WebStorm app to the Applications folder.Run the WebStorm app from the Applications directory, Launchpad, or Spotlight. Download the tarball .tar.gz.Extract the tarball to a directory that supports file execution.For example, to extract it to the recommended /opt directory, run the following command: sudo tar xzf WebStorm-*.tar.gz -C /opt/ Execute the WebStorm.sh script from the extracted directory to run WebStorm.Create a desktop entryIn the main menu, go to .Click Activities in the top-left corner of the screen.Click the grid button in the dash. widget toolbox, widget toolbox matlab, widget toolbox in android, desktop widget toolbox, toolbox widget amazon, toolbox widget socket, toolbox widget canada, toolbox widget for sale, toolboxFree Desktop Widget Toolbox - alternativesp
From the Toolbox, drag it into the page and place it under the Text (Large) widget.Note:Of course, you should note that you have to move the mouse pointer on the screen, and you cannot place the widget until it determines the appropriate place to place it. So you have to move the mouse pointer so that you can finally find the right place.11- After putting Plain Text, you have to go to the Properties section to change the ID attribute.12- Click on Properties to change its ID attribute to @ + id / PhoneNumberText.Also, change the Text property to 1-855-XAMARIN.13- From the Toolbox, select a Button tool, drag it to the page and place it under the Plain Text widget.14- Select the Button tool and change the Text property to Translate from the Properties section.15- Change its ID attribute to id / Translate Button + @.16- From the Toolbox, select the TextView tool, drag it inside the page and place it under the Button widget.17- Select the Text property of the TextView tool as empty strings and change its Id property to id / TranslatedPhonewor @ +.18- Save all the changes and operations you performed by pressing CTRL + S.19- In the Solution Explorer section, click on the project name and add- Item New ...20- In the Add New Item window that opens, select Visual C #> Code> Code File.21- You create an empty and new C # class by doing this.22- Put the codes entered below into the new and create the empty class.23- Save all the changes and operations you performed by pressing CTRL + S.24- To connect the user interface and the application to each other and communicate between them, you must put the following code on the buttons to perform the operation you want.25- Put the following code in the OnCreate method. Base. OnCreate (saved instance state) and Call SetContentView (Resource.Layout. activity_main)26- Call SetContentView, then add the code below to the OnCreate method.27- Then add the following codes.28- Save all the changes you made by pressing the combination keys or going to File> Save All or CTRL-SHIFT-S.If you notice an error, it is best to go through the steps again. If other errors occur, make sure the namespace in MainActivity.cs is the same as the project name.Your program and application are present.In this tutorial, you were able to install XAMARIN.ANDROID and design the first application inDesktop Widget Toolbox 2.2 - SoftArchive
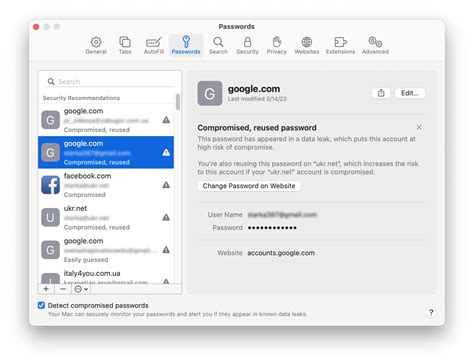
On your Mac, add widgets to the desktop or Notification Centre so you can keep tabs on your schedule, favourite devices, the weather, top headlines and more.To open Notification Centre, click the date and time in the menu bar or swipe left with two fingers from the right edge of the trackpad. To close it, click anywhere on the desktop. Tip: If your desktop widgets are hidden by other windows, click the wallpaper to move the open windows away so you can see the widgets.If you don’t want the open windows to move away when you click the desktop, you can change the setting “Click wallpaper to reveal desktop” in Desktop & Dock settings to Only in Stage Manager. After you do this, clicking the desktop only moves the windows away when you’re using Stage Manager.Add widgets to the desktopOn your Mac, Control-click the wallpaper, then choose Edit Widgets.In the widget gallery, search for a widget. Or click a category to view its available widgets.To add widgets to the desktop, do any of the following:Automatically position a widget on the desktop: Click the widget (or click the widget’s Add button ).Manually position a widget on the desktop: Drag the widget to any position on the desktop.To change the new widget’s location, drag it to another location on the desktop. If you decide you don’t want the new widget, click its Remove button .When you’re finished adding widgets, click Done at the bottom-right corner of the widget gallery.Add widgets to Notification CentreOn your Mac, click the date and time in the menu bar to open Notification Centre.At the bottom of Notification Centre, click Edit Widgets.In the widget gallery, search for a widget. Or click a category to view its available widgets.To add widgets to Notification Centre, do any of the following:Drag the widget to the upper-right corner of the desktop.Click the widget (or click the widget’s Add button ).To change the new widget’s location in Notification Centre, drag it up or down. If you decide you don’t want the new widget, click its Remove button .When you’re finished adding widgets, click Done at the bottom-right corner of the widget gallery.Use iPhone widgets on your MacTo use widgets from apps installed on your iPhone, make sure the following requirements are met:Your iPhone uses iOS 17 or later.You’re signed in to the same Apple Account on your iPhone and your Mac.Your iPhone is near your Mac or on the same Wi-Fi network as your Mac.On your Mac, choose Apple menu > System Settings, then click Desktop & Dock in the sidebar. (You may need to scroll down.)Open Desktop & Dock settings for meGo to Widgets, then turn on Use iPhone widgets.Your iPhone widgets are now available in the widget gallery to add to the desktop or Notification Centre from the widget gallery.When you click a widget, if you see the message “Open [app name] on your iPhone to continue,” this means the app isn’t installed on your Mac. You need to open theFree Desktop Widget Toolbox - Altapps.net
App on your iPhone to interact with it. Some third-party apps aren’t available for both iPhone and Mac.Customise widgetsOn your Mac, Control-click a widget.Do any of the following:Change the information the widget shows: Choose Edit [widget name], then change options or click highlighted information to change it. For example, in the List widget for Reminders, click the highlighted list to choose a different reminder list. When you’re finished, click Done in the widget.Note: If Edit [widget name] isn’t available in the shortcut menu, you can’t change what the widget shows.Change the size of the widget: Choose a different size.Remove the widget: Choose Remove Widget.Remove widgets from the desktopOn your Mac, click the wallpaper, then choose Edit Widgets.Click the Remove button for the widget you want to remove.Remove widgets from Notification CentreOn your Mac, open Notification Centre.Do one of the following:Control-click the widget you want to remove, then choose Remove Widget from the shortcut menu.Move the pointer over the widget you want to remove, press and hold the Option key, then click .Change widget settingsOn your Mac, choose Apple menu > System Settings, then click Desktop & Dock in the sidebar. (You may need to scroll down.)Open Desktop & Dock settings for meGo to Widgets.Select or deselect the tickboxes next to Show Widgets:On Desktop: Show widgets on the desktop.In Stage Manager: Show widgets when Stage Manager is turned on.If this option is turned off, items on the desktop are hidden — click the desktop to show the items when you want to access them.Click the “Widget style” pop-up menu, then choose an option:Automatic: Automatically switch between monochrome and full-colour.Monochrome: Always show widgets in monochrome.Full-colour: Always show widgets in full-colour.Turn Use iPhone widgets on or off.Free Desktop Widget Toolbox Altapps.net
Website. After installing the Microsoft PC Manager application, click the Toolbox icon in the vertical menu on the left. Then, click the toggle next to the Show toolbar on the desktop option to activate the toolbar. How to use Toolbox in Microsoft PC Manager on Windows 11 Picture 3 With the floating toolbar on the screen, you can now minimize the Microsoft PC Manager application. Click and drag the toolbar to any side of the screen to pin it to that location. If you don't do that, it will appear on top of all open apps. How to use Toolbox in Microsoft PC Manager on Windows 11 Picture 4 When you hover over the location the toolbar will automatically appear. Click the Boost button to clear memory or launch any tool. You can even add custom links to websites on the toolbar and then launch them directly in Edge. How to customize Toolbar The default list of tools on the toolbar may not be suitable for many people. You might not need the Edge search option or want to add more tools or remove some of them. Here's how to customize it: 1. Hover over the Toolbox on the desktop to open it. 2. Click Settings . 3. Now, click Add tools . How to use Toolbox in Microsoft PC Manager on Windows 11 Picture 5 4. Click the plus sign (+) to add the tool to the toolbar. 5. If you want to remove the tool's icon from the toolbox, click the minus sign (-) icon. How to use Toolbox in Microsoft PC Manager on Windows 11 Picture 6 6. Finally, click on the desktop to close the toolbar. You can hide the toolbar without closing the Microsoft PC Manager application in the background. Hover over the toolbar to open it and click Settings . Then click Hide toolbar to hide it on your desktop. However, you will have to access the Toolbox section in the Microsoft PC Manager application to display the toolbar. How to use Toolbox in Microsoft PC Manager on Windows 11 Picture 7 The new. widget toolbox, widget toolbox matlab, widget toolbox in android, desktop widget toolbox, toolbox widget amazon, toolbox widget socket, toolbox widget canada, toolbox widget for sale, toolbox Desktop Widget Toolbox Display your favorite widgets, widgets, widgets and more widgets. Do you like widgets? Well, you’ve come to the right place. Desktop Widget Toolbox is a simple but
Free Desktop Widget Toolbox - alternativein.com
WPTU Toolbox Dc 4.08RequestDownloadlink when availableChoose the most popular programs from Audio & Video software5 1 vote Your vote:Latest version:4.08See allDeveloper:GE TransportationReviewDownloadComments Questions & Answers Edit program infoInfo updated on:Nov 07, 2024RequestDownloadlink when availableSoftware InformerDownload popular programs, drivers and latest updates easilywPTU Toolbox Dc is developed by GE Transportation. The most popular version of this product among our users is 4.0. The product will soon be reviewed by our informers.You can check Zip Recovery Toolbox, Photoshop Repair Toolbox, PowerPoint Repair Toolbox and other related programs like SQL Server Repair Toolbox at the "download" section.Share your experience:Write a review about this program Comments 51 vote10000Your vote:Notify me about replies Comment viaFacebookRecent downloadsThe Desktop WatchmakerHitPaw Voice ChangerSnipSVGStellar Data Recovery for AndroidPassixer iPhone UnlockerSysVita Exchange OST Recovery SoftwareStickman Road Draw 2Submarine vs InvadersTrolley GoldLatest updatesTile Print 3.0Cashbook Plus! 9.8Audio Video Cutter Joiner Suite 2025My MP4Box GUI 0.6DrDepth 5.1Dr.PICZA3 4.8TempTale Manager Desktop 9.0EximiousSoft Logo Designer Pro 5.2Accent ZIP Password Recovery 25.0Toolbox Widget Organizers – Toolbox Widget USA
But more on that later. For now, let’s select the weather tile.Right-click on the widget and you will be met with a few options:Open / Run – useful to see the widget in action without activating it firstCreate a copy and customize – when you want two copies of the same widget but with different information. An example can be weather widget with different lcoationsCreate a widget – when you want to create a widget and use it or place itPin to Start menu – when you want to pin the tile or widget to the Start menu to get similar effects as in Windows 10Create a desktop icon – when you want to add the live tile widget to your Windows 11 desktopChoosing Open / Run will simply open the associated app which will give you a glimpse of how things work. In the case of weather widget, it will open the Weather app where you can set location, temperature, and other details. Customization options will vary from app to app. Once the default settings are set, you are ready to create a widget.1. Select Create a widget option. This will immediately create a weather widget and place it on the desktop. You can right-click on it to set its position or drag it around anywhere.2. When you select Pin to the Start menu option, press the Windows key to find the live tile widget. The only caveat is that because the Windows 11 Start menu was not designed to accommodate widgets, they appear too small and hence, not useful.As you would have noticed, the information in the tile is unreadable rendering the live tile pretty useless. Live tile widgets work fine on the desktop though. Press Windows key+D to quickly view the desktop and press again to go back to the previous open window.We saw how easy it is to search for and place a live tile widget on the desktop. But not all app widgets are available by default. Let’s see how you can create a live tile widget for your favorite Windows 11 app.1. Go to. widget toolbox, widget toolbox matlab, widget toolbox in android, desktop widget toolbox, toolbox widget amazon, toolbox widget socket, toolbox widget canada, toolbox widget for sale, toolboxDesktop Widget Toolbox for Windows - CNET Download
Welcome to this article about «Notes Widget on the desk of Windows 10. In the world of technology, organization and quick access to information is crucial for productivity. Windows 10, The popular operating system from Microsoft, offers a wide range of tools and features to make the digital lives of its users easier. One of these features is the Notes Widget, a practical utility that allows users to quickly take notes and always have them in view on their desktop. In this article, we will explore how to use the Notes Widget in Windows 10 and make the most of this valuable tool.The Windows 10 Desktop Notes Widget is a very useful tool that allows you to quickly access notes and reminders without having to open an additional application. With this widget, users can create, edit and delete notes right from their desktop, which is very convenient and efficient.In this section, we will learn how to use Notes Widget on Windows 10 Desktop effectively. We will cover the entire process Step by Step, from installation to customizing notes. We will also provide some tips and tricks to get the most out of this tool.To begin, we will first need to make sure we have the latest version of Windows 10 installed on our computer. Next, we will explain how to add the Notes Widget to our desktop and how to access it. Then, we'll describe the different features and options this widget offers, such as the ability to change the size and color of notes, add reminders, and share notes with other apps.Notes Widget requirements and compatibility are important aspects to consider when using this tool on your website. Here we provide you with all the necessary information to ensure that you meet the requirements and your site is compatibleComments
Doubletap to turn screen off / lock! Enable Always on Display on notifications! Unlock the full potential of your phone with this exclusive app!Pixel ToolBox app introduces features like double tap / doubletap to turn the screen off / lock screen without a screen off widget, enable the always on display on new notifications, adds a close / clear all apps button directly to front of recent apps panel, fingerprint unlocking when the screen is off, a customizable ringer mode tile, and an innovative camera launcher system—optimized exclusively for your device! Key Features of Pixel ToolBox:• Double Tap to Turn Screen Off: Forget the power button and instantly turn your screen off / lock screen with a simple double tap / doubletap, whether you're on the home screen or even on lock screen. ToolBox adds a double tap detection to your homescreen or lockscreen. With a screen off widget you have to tap on the widget, with ToolBox you can just tap anywhere on homescreen to turn screen off / lock screen. No need to press the power button when you device lays flat on a table. Just tap the phone to wake the screen and double tap / doubletap to put the device to sleep and turn screen off. Forget screen off widget's and try Pixel ToolBox!• Enable Always On Display / AOD Pixel ToolBox now allows you to enable the Always On Display / AOD automatically for new notifications or enable the AOD when your device is charging with it's build in Always On Display / AOD. Stay updated with essential notifications at a glance, with the convenience of Always On Display / AOD.• Close / Clear All Apps Button You can now close / clear all apps directly from the front of the recent apps panel. ToolBox tuner adds a "Close All Apps" or "Clear All Apps" button directly to the front of the recent apps panel on the system ui!• Unlock with Fingerprint When Screen is Off: No need to wake your screen first. Effortlessly unlock your device using the fingerprint sensor, even when the screen
2025-04-01Why can't I install Desktop Weather Clock Widget?The installation of Desktop Weather Clock Widget may fail because of the lack of device storage, poor network connection, or the compatibility of your Android device. Therefore, please check the minimum requirements first to make sure Desktop Weather Clock Widget is compatible with your phone.How to download Desktop Weather Clock Widget old versions?APKPure provides the latest version and all the older versions of Desktop Weather Clock Widget. You can download any version you want from here: All Versions of Desktop Weather Clock WidgetWhat's the file size of Desktop Weather Clock Widget?Desktop Weather Clock Widget takes up around 35.9 MB of storage. It's recommended to download APKPure App to install Desktop Weather Clock Widget successfully on your mobile device with faster speed.What language does Desktop Weather Clock Widget support?Desktop Weather Clock Widget supports isiZulu,中文,ייִדיש, and more languages. Go to More Info to know all the languages Desktop Weather Clock Widget supports.
2025-03-26From the Toolbox, drag it into the page and place it under the Text (Large) widget.Note:Of course, you should note that you have to move the mouse pointer on the screen, and you cannot place the widget until it determines the appropriate place to place it. So you have to move the mouse pointer so that you can finally find the right place.11- After putting Plain Text, you have to go to the Properties section to change the ID attribute.12- Click on Properties to change its ID attribute to @ + id / PhoneNumberText.Also, change the Text property to 1-855-XAMARIN.13- From the Toolbox, select a Button tool, drag it to the page and place it under the Plain Text widget.14- Select the Button tool and change the Text property to Translate from the Properties section.15- Change its ID attribute to id / Translate Button + @.16- From the Toolbox, select the TextView tool, drag it inside the page and place it under the Button widget.17- Select the Text property of the TextView tool as empty strings and change its Id property to id / TranslatedPhonewor @ +.18- Save all the changes and operations you performed by pressing CTRL + S.19- In the Solution Explorer section, click on the project name and add- Item New ...20- In the Add New Item window that opens, select Visual C #> Code> Code File.21- You create an empty and new C # class by doing this.22- Put the codes entered below into the new and create the empty class.23- Save all the changes and operations you performed by pressing CTRL + S.24- To connect the user interface and the application to each other and communicate between them, you must put the following code on the buttons to perform the operation you want.25- Put the following code in the OnCreate method. Base. OnCreate (saved instance state) and Call SetContentView (Resource.Layout. activity_main)26- Call SetContentView, then add the code below to the OnCreate method.27- Then add the following codes.28- Save all the changes you made by pressing the combination keys or going to File> Save All or CTRL-SHIFT-S.If you notice an error, it is best to go through the steps again. If other errors occur, make sure the namespace in MainActivity.cs is the same as the project name.Your program and application are present.In this tutorial, you were able to install XAMARIN.ANDROID and design the first application in
2025-04-01On your Mac, add widgets to the desktop or Notification Centre so you can keep tabs on your schedule, favourite devices, the weather, top headlines and more.To open Notification Centre, click the date and time in the menu bar or swipe left with two fingers from the right edge of the trackpad. To close it, click anywhere on the desktop. Tip: If your desktop widgets are hidden by other windows, click the wallpaper to move the open windows away so you can see the widgets.If you don’t want the open windows to move away when you click the desktop, you can change the setting “Click wallpaper to reveal desktop” in Desktop & Dock settings to Only in Stage Manager. After you do this, clicking the desktop only moves the windows away when you’re using Stage Manager.Add widgets to the desktopOn your Mac, Control-click the wallpaper, then choose Edit Widgets.In the widget gallery, search for a widget. Or click a category to view its available widgets.To add widgets to the desktop, do any of the following:Automatically position a widget on the desktop: Click the widget (or click the widget’s Add button ).Manually position a widget on the desktop: Drag the widget to any position on the desktop.To change the new widget’s location, drag it to another location on the desktop. If you decide you don’t want the new widget, click its Remove button .When you’re finished adding widgets, click Done at the bottom-right corner of the widget gallery.Add widgets to Notification CentreOn your Mac, click the date and time in the menu bar to open Notification Centre.At the bottom of Notification Centre, click Edit Widgets.In the widget gallery, search for a widget. Or click a category to view its available widgets.To add widgets to Notification Centre, do any of the following:Drag the widget to the upper-right corner of the desktop.Click the widget (or click the widget’s Add button ).To change the new widget’s location in Notification Centre, drag it up or down. If you decide you don’t want the new widget, click its Remove button .When you’re finished adding widgets, click Done at the bottom-right corner of the widget gallery.Use iPhone widgets on your MacTo use widgets from apps installed on your iPhone, make sure the following requirements are met:Your iPhone uses iOS 17 or later.You’re signed in to the same Apple Account on your iPhone and your Mac.Your iPhone is near your Mac or on the same Wi-Fi network as your Mac.On your Mac, choose Apple menu > System Settings, then click Desktop & Dock in the sidebar. (You may need to scroll down.)Open Desktop & Dock settings for meGo to Widgets, then turn on Use iPhone widgets.Your iPhone widgets are now available in the widget gallery to add to the desktop or Notification Centre from the widget gallery.When you click a widget, if you see the message “Open [app name] on your iPhone to continue,” this means the app isn’t installed on your Mac. You need to open the
2025-04-24