Download OpenNebula
Author: n | 2025-04-23
OpenNebula 4.0, OpenNebula 4.10, OpenNebula 4.12, OpenNebula 4.14, OpenNebula 4.2, OpenNebula 4.4, OpenNebula 4.6, OpenNebula 4.8, OpenNebula 5.0 Description There is a
OpenNebula book released! - OpenNebula - OpenNebula – Open
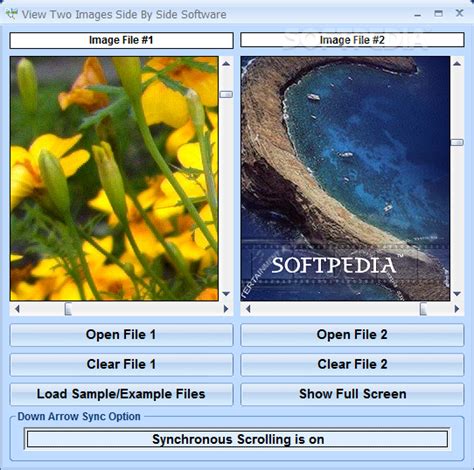
Add the repository with the following command:echo "deb stable opennebula" | tee /etc/apt/sources.list.d/opennebula.listNext, update the repository and install OpenNebula with the following command:apt-get update -yapt-get install opennebula opennebula-sunstone opennebula-gate opennebula-flow -yAfter installing OpenNebula, you will also need to install Ruby libraries to your instance. You can install them by running the following command:/usr/share/one/install_gemsConfigure OpenNebulaNext, you will need to open /etc/one/oned.conf file and defined database credentials in the file.nano /etc/one/oned.confMake the following changes:LISTEN_ADDRESS = "0.0.0.0"#DB = [ BACKEND = "sqlite" ]# Sample configuration for MySQL DB = [ BACKEND = "mysql", SERVER = "localhost", PORT = 0, USER = "openadmin", PASSWD = "password", DB_NAME = "opennebuladb", CONNECTIONS = 50 ]Save and close the file. Then, you will need to define OpenNebula authentication credential in one_auth file. You can do it with the following command:nano /var/lib/one/.one/one_authMake the following changes as per your need:oneadmin:admin@123 Save and close the file. When you are finished.Finally, start OpenNebula service and enable it to start on boot with the following command:systemctl start opennebulasystemctl enable opennebulasystemctl start opennebula-sunstonesystemctl enable opennebula-sunstoneYou can now check the status of OpenNebula with the following command:systemctl status opennebulaAndsystemctl status opennebula-sunstoneAccess OpenNebula Web InterfaceFirst, you will need to verify the OpenNebula installation on OpenNebula front-end instance.You can do it with the following command:su - oneadmin -c "oneuser show"Now, open your web browser and type the URL You will be redirected to the following page:Provide your administrator username and password which you have define in one_auth file and click on the Login button. You should see the OpenNebula dashboard in the following page:Install OpenNebula KVM NodeKVM is an open source hypervisor for OpenNebula's Open Cloud Architecture. By default, OpenNebula KVM package is not available in the Ubuntu 18.04 repository. So, you will need to add OpenNebula repository to your OpenNebula KVM instance. First, download and add the GPG key with the following command:wget -q -O- | apt-key add -Next, add the repository with the following command:echo "deb stable opennebula" | tee /etc/apt/sources.list.d/opennebula.listNext, update the repository and install OpenNebula KVM package with the following command:apt-get install opennebula-node -yNext, you will need to edit /etc/libvirt/libvirtd.conf for OpenNebula to work well with KVM.nano /etc/libvirt/libvirtd.confMake the following changes:unix_sock_group = "oneadmin"unix_sock_rw_perms = "0777"Save and close the file. Then, restart libvirtd service with the following command:systemctl restart libvirtdsystemctl restart libvirt-binConfigure Key-base SSH Authentication on OpenNebula Front-endOpenNebula Front-end connects to the OpenNebula KVM node using SSH. So, you will need to configure. OpenNebula 4.0, OpenNebula 4.10, OpenNebula 4.12, OpenNebula 4.14, OpenNebula 4.2, OpenNebula 4.4, OpenNebula 4.6, OpenNebula 4.8, OpenNebula 5.0 Description There is a StorPool OpenNebula - Download as a PDF or view online for free. StorPool OpenNebula - Download as a PDF or view online for free StorPool OpenNebula 0 likes . OpenNebula Project. This OpenNebula Releases, Candidate Versions, Call for Action, General Announcements. Search for: Search Button. Discover. OpenNebula 101. Why OpenNebula? Download OpenNebula; opennebula-node: Prepares a node as an opennebula-node. opennebula-sunstone: Sunstone (the GUI). opennebula-tools: Command Line interface. opennebula-gate: OneGate server that enables communication between VMs and OpenNebula. opennebula-flow: OneFlow manages services and elasticity. opennebula: OpenNebula Daemon. Download opennebula linux packages for Alpine. Alpine 3.21. Alpine Community aarch64 Official: opennebula-6.10.0-r0.apk: OpenNebula (currenty empty, install opennebula-tools instead) Community Blog How to Install and Configure OpenNebula on Ubuntu 18.04 How to Install and Configure OpenNebula on Ubuntu 18.04 In this tutorial, we will learn how to install and configure OpenNebula on an Alibaba Cloud Elastic Compute Service (ECS) Ubuntu 18.04 server. By Hitesh Jethva, Alibaba Cloud Community Blog author.IntroductionOpenNebula is a free, open source, simple yet powerful and flexible cloud computing platform for the management of virtualized data centers. It is easy to use and combines existing virtualization technologies with advanced features for multi-tenancy and elasticity. In this tutorial, we will learn how to install and configure OpenNebula on an Alibaba Cloud Elastic Compute Service (ECS) Ubuntu 18.04 server.PrerequisitesTwo fresh Alibaba Cloud instances with Ubuntu 18.04 server installed.A static IP address 192.168.0.102 is configured on OpenNebula front-end instance and 192.168.0.249 is configured on OpenNebula KVM node instance.Root password is set up on both instances.Create a new ECS instance and connect to your instance as the root user.Once you are logged into your Ubuntu 18.04 instance, run the following command to update your base system with the latest available packages.apt-get update -yInstall and Configure MariaDBFirst, you will need to install MariaDB database server to your OpenNebula front-end instance. You can install it with the following command:apt-get install mariadb-server -yAfter installing MariaDB, you will need to secure it first. You can secure it by running the following command:mysql_secure_installationAnswer all the questions as shown below: Enter current password for root (enter for none): Set root password? [Y/n]: N Remove anonymous users? [Y/n]: Y Disallow root login remotely? [Y/n]: Y Remove test database and access to it? [Y/n]: Y Reload privilege tables now? [Y/n]: YOnce the MariaDB server is secured, log in to MariaDB shell with the following command:mysql -u root -pEnter your root password, then create a database and user for OpenNebula with the following command:MariaDB [(none)]> CREATE DATABASE opennebuladb;MariaDB [(none)]> GRANT ALL PRIVILEGES ON opennebuladb.* TO 'openadmin' IDENTIFIED BY 'password';Next, flush the privileges and exit from the MariaDB shell with the following command:MariaDB [(none)]> FLUSH PRIVILEGES;MariaDB [(none)]> QUIT;Next, restart MariaDB service with the following command:systemctl restart mariadbNext, check the status of MariaDB service with the following command:systemctl status mariadbInstall OpenNebulaBy default, OpenNebula is not available in the Ubuntu 18.04 default repository. So, you will need to add OpenNebula repository to your OpenNebula front-end instance.First, download and add the GPG key with the following command:wget -q -O- | apt-key add -Next,Comments
Add the repository with the following command:echo "deb stable opennebula" | tee /etc/apt/sources.list.d/opennebula.listNext, update the repository and install OpenNebula with the following command:apt-get update -yapt-get install opennebula opennebula-sunstone opennebula-gate opennebula-flow -yAfter installing OpenNebula, you will also need to install Ruby libraries to your instance. You can install them by running the following command:/usr/share/one/install_gemsConfigure OpenNebulaNext, you will need to open /etc/one/oned.conf file and defined database credentials in the file.nano /etc/one/oned.confMake the following changes:LISTEN_ADDRESS = "0.0.0.0"#DB = [ BACKEND = "sqlite" ]# Sample configuration for MySQL DB = [ BACKEND = "mysql", SERVER = "localhost", PORT = 0, USER = "openadmin", PASSWD = "password", DB_NAME = "opennebuladb", CONNECTIONS = 50 ]Save and close the file. Then, you will need to define OpenNebula authentication credential in one_auth file. You can do it with the following command:nano /var/lib/one/.one/one_authMake the following changes as per your need:oneadmin:admin@123 Save and close the file. When you are finished.Finally, start OpenNebula service and enable it to start on boot with the following command:systemctl start opennebulasystemctl enable opennebulasystemctl start opennebula-sunstonesystemctl enable opennebula-sunstoneYou can now check the status of OpenNebula with the following command:systemctl status opennebulaAndsystemctl status opennebula-sunstoneAccess OpenNebula Web InterfaceFirst, you will need to verify the OpenNebula installation on OpenNebula front-end instance.You can do it with the following command:su - oneadmin -c "oneuser show"Now, open your web browser and type the URL You will be redirected to the following page:Provide your administrator username and password which you have define in one_auth file and click on the Login button. You should see the OpenNebula dashboard in the following page:Install OpenNebula KVM NodeKVM is an open source hypervisor for OpenNebula's Open Cloud Architecture. By default, OpenNebula KVM package is not available in the Ubuntu 18.04 repository. So, you will need to add OpenNebula repository to your OpenNebula KVM instance. First, download and add the GPG key with the following command:wget -q -O- | apt-key add -Next, add the repository with the following command:echo "deb stable opennebula" | tee /etc/apt/sources.list.d/opennebula.listNext, update the repository and install OpenNebula KVM package with the following command:apt-get install opennebula-node -yNext, you will need to edit /etc/libvirt/libvirtd.conf for OpenNebula to work well with KVM.nano /etc/libvirt/libvirtd.confMake the following changes:unix_sock_group = "oneadmin"unix_sock_rw_perms = "0777"Save and close the file. Then, restart libvirtd service with the following command:systemctl restart libvirtdsystemctl restart libvirt-binConfigure Key-base SSH Authentication on OpenNebula Front-endOpenNebula Front-end connects to the OpenNebula KVM node using SSH. So, you will need to configure
2025-04-12Community Blog How to Install and Configure OpenNebula on Ubuntu 18.04 How to Install and Configure OpenNebula on Ubuntu 18.04 In this tutorial, we will learn how to install and configure OpenNebula on an Alibaba Cloud Elastic Compute Service (ECS) Ubuntu 18.04 server. By Hitesh Jethva, Alibaba Cloud Community Blog author.IntroductionOpenNebula is a free, open source, simple yet powerful and flexible cloud computing platform for the management of virtualized data centers. It is easy to use and combines existing virtualization technologies with advanced features for multi-tenancy and elasticity. In this tutorial, we will learn how to install and configure OpenNebula on an Alibaba Cloud Elastic Compute Service (ECS) Ubuntu 18.04 server.PrerequisitesTwo fresh Alibaba Cloud instances with Ubuntu 18.04 server installed.A static IP address 192.168.0.102 is configured on OpenNebula front-end instance and 192.168.0.249 is configured on OpenNebula KVM node instance.Root password is set up on both instances.Create a new ECS instance and connect to your instance as the root user.Once you are logged into your Ubuntu 18.04 instance, run the following command to update your base system with the latest available packages.apt-get update -yInstall and Configure MariaDBFirst, you will need to install MariaDB database server to your OpenNebula front-end instance. You can install it with the following command:apt-get install mariadb-server -yAfter installing MariaDB, you will need to secure it first. You can secure it by running the following command:mysql_secure_installationAnswer all the questions as shown below: Enter current password for root (enter for none): Set root password? [Y/n]: N Remove anonymous users? [Y/n]: Y Disallow root login remotely? [Y/n]: Y Remove test database and access to it? [Y/n]: Y Reload privilege tables now? [Y/n]: YOnce the MariaDB server is secured, log in to MariaDB shell with the following command:mysql -u root -pEnter your root password, then create a database and user for OpenNebula with the following command:MariaDB [(none)]> CREATE DATABASE opennebuladb;MariaDB [(none)]> GRANT ALL PRIVILEGES ON opennebuladb.* TO 'openadmin' IDENTIFIED BY 'password';Next, flush the privileges and exit from the MariaDB shell with the following command:MariaDB [(none)]> FLUSH PRIVILEGES;MariaDB [(none)]> QUIT;Next, restart MariaDB service with the following command:systemctl restart mariadbNext, check the status of MariaDB service with the following command:systemctl status mariadbInstall OpenNebulaBy default, OpenNebula is not available in the Ubuntu 18.04 default repository. So, you will need to add OpenNebula repository to your OpenNebula front-end instance.First, download and add the GPG key with the following command:wget -q -O- | apt-key add -Next,
2025-03-29Passwordless ssh authentication between them. You can do this by distributing the public key of the user oneadmin from both machines to the file /var/lib/one/.ssh/authorized_keys.First, create the known_hosts file with the following command:ssh-keyscan 192.168.0.102 >> /var/lib/one/.ssh/known_hostsssh-keyscan 192.168.0.249 >> /var/lib/one/.ssh/known_hostsNext, copy /var/lib/one/.ssh directory to OpenNebula KVM node with the following command:scp -rp /var/lib/one/.ssh [email protected]:/var/lib/one/Next, test ssh connection from Front-end, you should not be prompted for a password:ssh 192.168.0.249Add KVM Host to OpenNebula Front-endNext, you will need to add KVM host to OpenNebula front-end so that OpenNebula can launch VMs on it.On the OpenNebula web interface, open Infrastructure >> Hosts and Click on the + button. You should see the following page:Select KVM for type field and IP address of KVM node. Then, click on the Create button. You should see the following page:Now, click on the Hosts. You should see the detail information of KVM node in the following page:Congratulations! You have successfully installed and configured OpenNebula on an ECS Ubuntu18.04 server. Hiteshjethva 39 posts | 5 followers Follow You may also like Comments 5491783352582057 March 4, 2020 at 8:28 pm Hi, Great Reading ! Is there any way to deploy VMs with public IPs from sunstone. Regards. Hiteshjethva 39 posts | 5 followers Follow Related Products Super App Solution for Telcos Alibaba Cloud (in partnership with Whale Cloud) helps telcos build an all-in-one telecommunication and digital lifestyle platform based on DingTalk. Learn More ECS(Elastic Compute Service) Elastic and secure virtual cloud servers to cater all your cloud hosting needs. Learn More ECS Bare Metal Instance An elastic and horizontally scalable high-performance computing service providing the same computing performance as traditional physical servers including physical isolation. Learn More EMAS Superapp Build superapps and corresponding ecosystems on a full-stack platform Learn More
2025-04-19For generic KVM servers with libvirt, Alt Server-V, OpenStack, OpenNebula and any other virtualization environments based on them. To save a memory dump in ELF format to the KVM host, run as root: sudo virsh dump --memory-only All virsh commands can be run without sudo, if the user is in libvirt group To save a dump in Windows crashdump format, VM has to have latest virtio-win drivers installed and vmcoreinfo feature has to be enabled in VM's configuration file: export VMID=; export xml_path="/etc/libvirt/qemu/$VMID.xml"; sudo grep vmcoreinfo $xml_path; if [ $? -ne 0 ]; virsh shutdown $VMID; sudo systemctl stop libvirtd; then sudo sed -i "s//&\n /" $xml_path; sudo systemctl start libvirtd; sudo virsh start $VMID; fi; After VM boots up (or crashes), run the following to create the dump: sudo virsh qemu-monitor-command dump-guest-memory -w file> Check dump file size, if it is 0 bytes, it means that the VM couldn't load the vmcoreinfo driver and the only way is to create an ELF dump Copy the dump from the node, one way it can be done is by using scp: scp @: Citrix Hypervisor The only way to capture a memory dump in a virtual machine running on Citrix Hypervisor is to use memory dump mechanisms built into the guest OS, but a crash of the guest can be triggered from the hypervisor by running:
2025-03-28, /PRNewswire/ -- StorPool Storage, leaders in next-generation primary data storage software solutions, today introduced the first-ever Disaster Recovery Engine for KVM-based cloud infrastructure that empowers IT service providers and enterprises to recover virtual machines in minutes whenever disaster strikes.A first-of-its-kind solution, the StorPool Disaster Recovery Engine (DRE) simplifies the configuration and execution of disaster recovery (DR) services for virtual machines (VM) in cloud infrastructure built using the Linux KVM hypervisor and the StorPool Storage platform. The StorPool DRE can protect environments with tens to thousands of VMs. It simplifies disaster recovery scenarios like 1:1, many to 1, many to many, and delivers industry-leading recovery point objective (RPO) and recovery time objective (RTO) of virtual machines in disaster scenarios, to ensure uninterrupted business operations.This new capability makes StorPool Storage the first-ever software-defined primary data storage platform with built-in DR capabilities for KVM-based clouds. StorPool's Disaster Recovery Engine helps companies minimize data-at-risk and downtime, while automating VM failover and failback in disaster scenarios. This eliminates the need for customers to use a myriad of products from different vendors to perform backup and DR for business continuity purposes.Until now, functionality like this has been available in other ecosystems (e.g. VMware by Broadcom), but implementing it for KVM-based clouds has been too complicated and costly, limiting the adoption of the KVM hypervisor. StorPool Storage is fully integrated with the most widely used KVM Cloud Management Platforms - CloudStack, OpenNebula, OpenStack, and Proxmox."StorPool's Disaster Recovery (DR) Engine has become a pivotal component of RapidCompute's
2025-03-26Things that don’t have a major impact on performance. What you listed there does not help me at all from the position of an advanced user. I am interested in solving bugs and providing new features. Between us, I don’t sit all day with my nose in the web interface because I am in Terminal for everything. Each package *-min does the job for which it was created. I admit that with Clouldmin I felt more drawn to OpenNebula and I have never used Usermin.It’s hard for me to compare Virtualmin/Webmin with cPanel/WHM because by far the first is much more accomplished. Only one who has used them a lot can contradict me. For me, things like the use of Bootstrap framework in the interface do not help me at all. The current theme is really nice compared to what existed in the past, it has a day/night model, File Manager, an many more. Why would I care so much about what happens there since once the setup is complete I don’t access the interface very often?I close this personal feedback telling you that it is not important to change the name of a product that is already established, others are more important. and the forum is full of problems that need to be solved by someone.My advice is to install it and get your doctorate in use. You’ll change your opinion after a while, that’s how I see it from where I’m sitting now. Your initial post will remain and you can reread it in about 2 years. Joe August 9, 2023, 7:13pm 6 Virtualmin (the whole system you get when you install using the Virtualmin installer) includes a Webmin module (a dozen, or so, Webmin modules, actually). But it’s a lot more complicated than being a module of Webmin.Depends on your definition of “bigger”. Virtualmin is more code (since it’s Webmin plus all the Virtualmin modules and tools). But, Webmin has a million or more active installs. Virtualmin has 150k or so.Not possible.Webmin is a very light-dependency package. It runs everywhere. Virtualmin is a big stack of packages,
2025-03-24